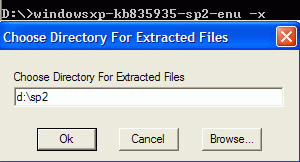
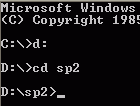
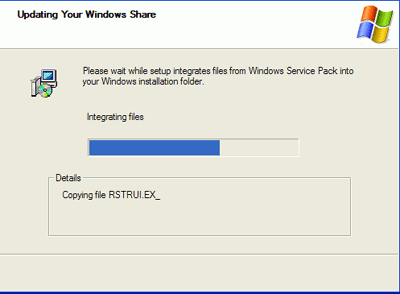
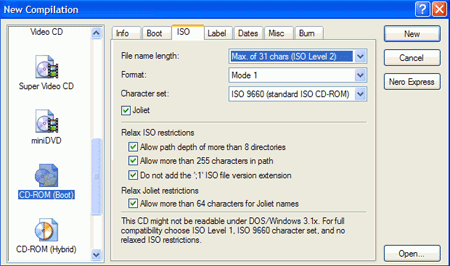
With XP Service Pack 2 just released, users and IT departments across the world are scrambling to test and update their Microsoft-based PCs with its new features. Unfortunately, updating to service pack 2 (SP2) is a time consuming process, especially if you have more than one PC to upgrade. As usual, Microsoft has published the service pack in the form of a single downloadable file for IT professionals who need to apply it to multiple machines over a network. This is all well and good, but what if you are dealing with several, or dozens of new systems which require XP to be installed, along with its latest service pack? The idea of installing Windows XP first then painstakingly applying its latest service pack to each machine seems... unnecessary. Fortunately, that's exactly what it is - unnecessary - there is an easier way, and PCstats is about to show you how to do it. The technique relies on a little know capability native to Windows 2000 and XP; that Microsoft included the ability to 'slipstream' the installation process. Slipstreaming refers to the process of creating a new bootable installation CD or network file for Windows XP or Windows 2000 installations which contains all the original operating system files, plus the latest Service Pack. In this guide, PCstats will detail how to create a bootable Windows XP CD with Service Pack 2 included. We will also cover the steps for creating a network installable file with the same modifications for use by a large IT department, as well as a Windows 2000 bootable CD with the latest Service Pack 4 included. What do you need to do all this? To create a Windows XP bootable CD or network file with Service Pack 2, you will need: Legal Issues Please note that while you can use the streamlining method to create an updated version of your own Windows XP CD with Service Pack 2 installed, this does not give you the legal right to use it on more than one machine at a time. A Windows XP license can still only be used on a single system at a time, unless you are using a volume license. OEM licenses (versions of Windows pre-installed on assembled computers) are considered to apply only to the computer they are first installed on, and may not be transferred to other systems. Be aware of these issues when preparing and creating your new CD. For a more in-depth look at the subject, see our article on Legally Copying Software. With that out of the way, lets begin our step by step look at how to Slipstream WindowsXP and Service Pack 2 onto one bootable installation CD... Creating An XP Service Pack 2 bootable CD Step 1: Create directories As we start through the procedure for creating your slipstreamed CD, the first thing you must do is create a pair of separate directories to hold the WinXP installation CD and Service Pack 2 data in. On a hard drive with at least 1.5GB of space free, create two folders using Windows Explorer. One will be called 'XPCD' and the other 'SP2.' It's best if you create these folders right off the root directory of your drive, ie D:/XPCD and D:/SP2, to avoid confusion later. Step 2: Move the Service Pack 2 file Time to move the Service Pack 2 file to a location where it can be easily extracted and used. WinXP-SP2, 266MB, is available here. Move the Service Pack 2 file (WindowsXP-KB835935-SP2-ENU or similar) to the root directory of the drive you just created the 'XPCD' and 'SP2' directories in. Step 3: extract the service pack files The Service Pack is downloaded as a single compressed file. We need to extract it into the directory we created in order to go about using it to update our XP files. Open a command prompt by going to 'Start / Run' and typing 'CMD.' Navigate to the root directory of the drive you are using for this procedure by typing the drive letter followed by a colon. For example, to get to the D:/ drive, type 'D:' Type the name of the service pack followed by '-x' and press enter. A window will pop up prompting you for a location to uncompress the service pack files to. Enter the location of the 'D:/SP2' directory you just created and hit OK. The service pack files will be extracted to that location. Now we need to move the Windows XP install CD and all its files and folders onto your PCs hard drive so we can update them. Place the WinXP install CD in your CD drive and using Windows Explorer, navigate to the drive. Highlight all files and folders, right click and select 'copy.' Now navigate to your 'D:/XPCD' directory, right click and hit 'paste.' Wait the few minutes it will take while the contents of the WindowsXP install CD are copied into the directory on your hard drive. Step 5: Updating the 'D:/XPCD' directory with Windows XP Service Pack 2 In this step, we run the 'update' command built into each service pack with the 'integrate' switch, which will merge our Service Pack 2 files with the WinXP install CD files and folders we copied onto our hard drive in the last step. Now we need to update the XP files in the 'D:/XPCD' directory with our newly extracted Service Pack 2 files. Open a command prompt by going to 'Start / Run' and typing 'CMD.' Navigate to the 'D:/SP2' directory by first changing drives if necessary ('D:/,' 'E:/', etc.), then typing 'CD SP2' While still at the command prompt, type 'CD i386\update' to enter that directory. Type 'update /S:(yourdrivename):\XPCD' and hit enter to begin the update process. A window will come up and detail the install procedure. Step 6: Extracting the WinXP boot image from the CD We need a bootable CD image file in order to create a bootable CD from our newly modified XP files. Fortunately, the Windows XP install CD already has a perfectly usable boot file; we just need to get at it. Isobuster is an invaluable free tool for accessing and extracting files from CDs and CD images. Isobuster software is available here. Insert your WinXP install CD into the drive and open up Isobuster. Navigate to the 'bootable CD' directory. In the right hand pane, highlight 'Microsoft Corporation.IMG'. Right click it and select 'Extract Microsoft Corporation.IMG'. Extract the file to your 'D:XPCD' directory. Step 7A: Create the bootable WinXP Service Pack 2 CD with Nero Version 6 Now we will create the actual bootable CD from the files we have assembled and updated. To do this, we will use Nero Burning Rom Version 6. Start up Nero and select 'CD-Rom (boot)' as the type of disk you wish to make. From the 'boot' tab, change the image file to the 'Microsoft Corporation.IMG' file that you extracted from the XP CD in the last step. Note that you will have to change the 'files of type' box from '.IMA' files to 'all files' in order to locate your file in its directory. Check 'enable expert settings.' In this section, you will need to change the 'kind of emulation' dropdown box to 'no emulation' and the 'number of loaded sectors' value to 4. Now change to the 'ISO' tab. Change the 'file name length' dropdown box to 'max. of 31 chars (ISO level 2)' all boxes on the screen should be checked. It's essential that the version of Nero you are using supports the 'do not add the ";1" ISO file version extension' option, or the CD you create will not boot properly. If you have an older version of Nero, you will need to upgrade to version 5.5 or newer. Now click the 'new' button to open the CD content window. In the file browser to the right, navigate to your 'D:/XPCD' directory and expand it. Now select all of the files and folders in the far right pane and drag them into either of the blank panes to the left. Now highlight the 'Microsoft corporation.IMG' file in the left window and delete it, since it is not needed on the CD. Now click the 'burn' button on the toolbar and check the 'write' and 'finalize CD' options before burning the CD. Now you can use your newly created disk to install Windows XP with Service pack 2 already installed! Step 7B: Create the bootable WinXP Service Pack 2 CD with Roxio Easy CD and DVD creator 6 Now that we have all the files and folders prepared, let's look at how to create a bootable CD out of them with Roxio's Easy CD and DVD creator software, since this is the second most popular burning software on the market, and just as capable as Nero 6 at getting the job done. Start Easy CD and DVD creator and select ‘file\new project\bootable disk.’ In the ‘choose type of bootable disk’ screen, set the ‘bootable disk type’ drop down box to ‘no emulation.’ Click the ‘advanced’ button and set ‘load segment’ to ‘0x7c0’ and ‘sector count’ to 4. Click the 'browse' button and navigate to the 'Microsoft corporation.IMG' file you extracted from the XP CD in the previous step. Click 'Ok.' Step 7B: Create the bootable WinXP SP2 CD Con't Now go to 'file\project properties.' On this screen, 'file system' should be set to 'Joliet' and 'physical format of disk' to 'mode 1: CD-ROM.' Now go to the 'file filter' tab and uncheck both 'do not add hidden' and 'do not add system files.' Ensure that the setting at the top is on 'all files.' Click 'OK.' In the 'select source' pane, navigate to your 'D:/XPCD' directory and highlight all files and folders. Click the 'add to project' arrow to move these files onto the CD. Remove the 'Microsoft corporation.IMG' file from the bottom pane, then hit the 'burn to disk' button to create your CD. In the 'record setup' screen, choose the 'record' and 'disk-at-once' options, then create the CD. You should now have a usable Windows XP install CD with Service Pack 2! That is it for this section of the guide, if you have followed all of our steps correctly, you will have created a WindowsXP install CD with WinXP Service Pack 2 integrated right into it. With this one CD you can install a PC as you normally would with the Microsoft WindowsXP installation CD, except that when you load up Windows and right click on My Computer, you will clearly see that WinXP SP2 is already applied. For IT departments looking to save time, and ensure that the most updated versions of Windows is consistently being installed, Slipstreaming is a powerful tool. However, Slipstreaming also works with Windows2000, an operating system still in wide use in corporate environments. Let's look at how to Slipstream Windows2000 Installation CD with Windows2000 Service Pack 4 now. Windows 2000 and Windows 2003 server can be Slipstreamed using the exact same method as we detailed above. The only difference is the amount of disk space required for the files and the file names themselves. Download Windows 2000 Service pack 4 (132MB) and follow the same step as we have as described above for WinXP. Creating a streamlined XP CD image for network installation Once you have integrated the WinXP files with the Service Pack 2, you can also use the resulting directory to install the Slipstreamed Windows XP version over a network. Be aware that you will need a volume license from Microsoft in order to do this legitimately. This applies mostly to corporate or office situations, so the next few steps are a definitely a must for IT professionals to read through. There's a couple of ways to go about creating a streamlined network installation file, but since one of the ways involves a Windows 2000 or 2003 Server using RIS (Remote Install Service) we'll go with the other, simpler one. First you must share your 'D:/XPCD' directory. To do this, right click on the folder and choose 'sharing and security...' Your XPCD directory will now be shared over the network under the name 'XPCD.' To test this out, open the run command ('start\run.') and type '\\(yourcomputername)\XPCD' The XPCD folder should open in a new window. You are now ready to allow other users to access the install files. You need to create or acquire a network boot disk which will work with your existing network card and allow you to access the network share without Windows being installed. We've assembled three locations where you can download pre-made network boot disk images: http://www.nu2.nu/bootdisk/network/ With the use of these boot disks and the 'winnt.exe' file found in the 'I386' directory, you should be able to install WinXP over the network. This is not a procedure for beginners though, and will require various changes depending on your system's configuration. Remember to partition and format the drives on the system that will have XP installed, so that they are visible during the install process. Good luck!
Beginners Guide: Slipstreaming a WindowsXP Install CD with Service Pack 2
Slipstreaming is the technique for combining an installation CD like WindowsXP, with the latest Service Pack. This drastically cuts down on the time it takes to install a PC, because the patches and OS are installed together. Slipstreaming is the IT Departments secret weapon. - Version 1.1.0 





Step 7A: Create the bootable WinXP SP2 CD Con't 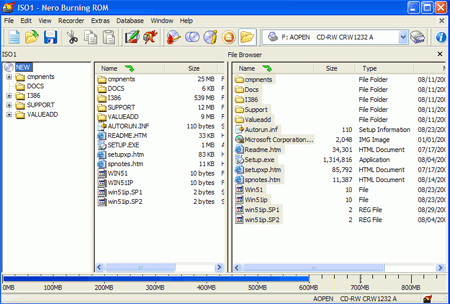
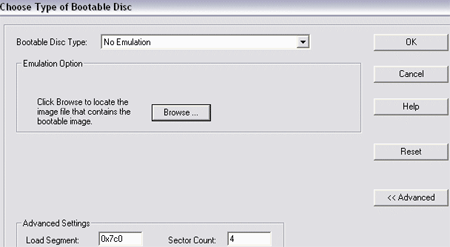
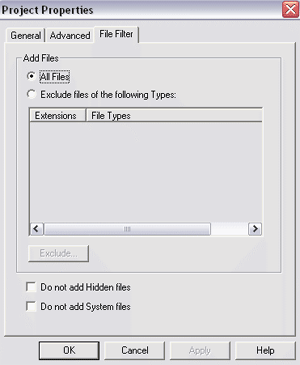
Slipstreaming Windows 2000 bootable CDs with Service Pack 4
From the 'XPCD properties' window, choose 'share this folder.'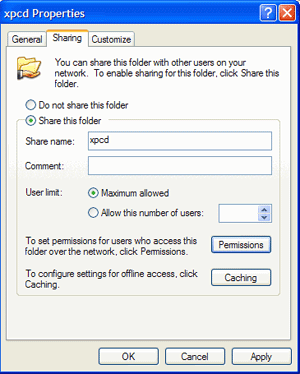
http://tdonline.com/bootdisk.htm
http://www.users.on.net/~driver/bootdisk/
Monday, January 28, 2008
SLIPSTREAMING WINDOWS OS
Subscribe to:
Post Comments (Atom)


No comments:
Post a Comment